I removed 3 of 5 LINUX systems from my laptop hard-disk,
using the graphical tool gparted (GNU partition editor).
The resulting space I used to create a new hard-disk partition.
As gparted did not let me define a mount-point for the new partition,
I turned to the fstab file
$ sudo gedit /etc/fstab
to add a mount line manually. But there I saw following line (for my MINT-partition):
UUID=e6606afe-96d5-4a4b-8f40-bdb5c2e98e51 /media/mint ext4 defaults 0 2
The partition is addressed using its UUID here, no more by device-name (like /dev/sda11).
This is said to be safer.
So I decided to do it that way - but, how to find out the UUID of the partition?
$ blkid
....
/dev/sda10: LABEL="Mint" UUID="e6606afe-96d5-4a4b-8f40-bdb5c2e98e51" TYPE="ext4" PARTUUID="bb049714-4b60-43b7-b8bd-997ebf94f085"
....
The blkid (block-identity) command helps out.
But now I wondered how I can avoid all that investigations for LINUX commands,
and do it with a graphical tool like a modern computer user would do!
So instead of copy & pasting the UUID that blkid
showed my into /etc/fstab, I started to search for a graphical fstab-editor.
And here it is (at least for Gnome-systems):
$ sudo gnome-disk
This UI comes up, below it you see the output of the blkid command:
This shows both the device-name and the UUID of my new partition.
Here is how to add it to /etc/fstab:
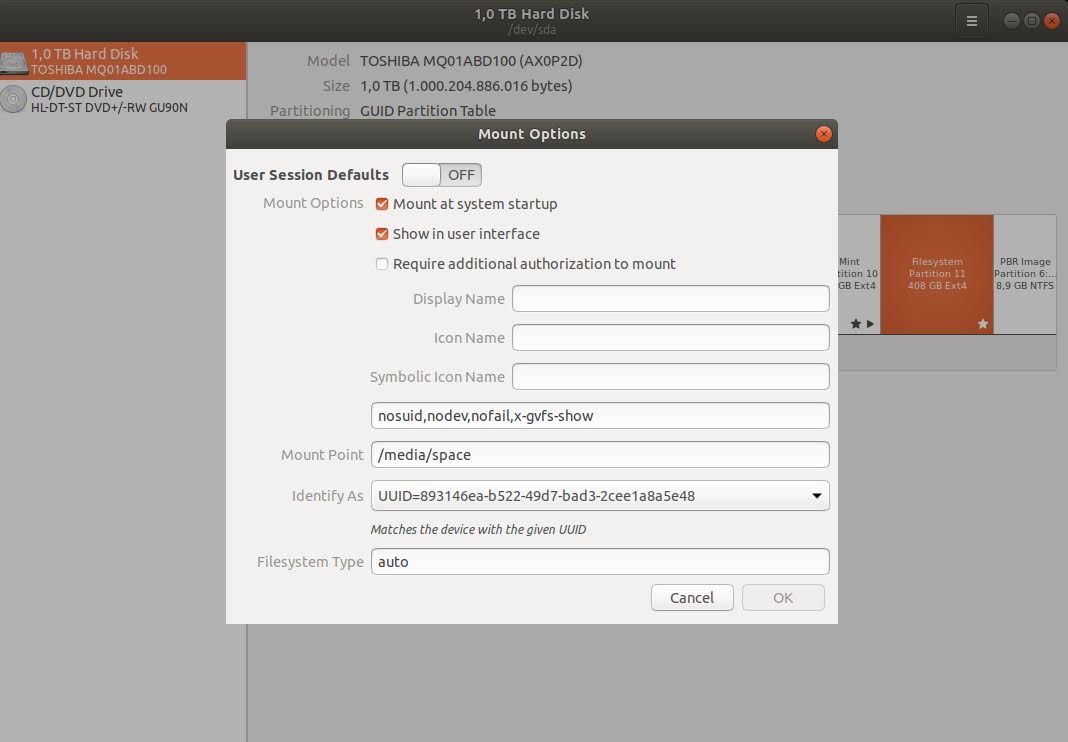
In the tools-menu, you find the item "Edit Mount Options", and there you can do it:
Here I have set the mount-directory to /media/space.
Then I chose the UUID-identification from the drop-down below.
Saved it, and it was in /etc/fstab!
I created the mount-directory:
$ sudo mkdir /media/space
$ ls -l /media
drwxr-xr-x   2 root root 4096 Dez  8 21:24 space
Restarted the computer, and I had a big disk instead of the 3 redundant LINUX installations that I never used. And I learnt how to solve problems with graphical tools instead of mystic command line hacking. Keep yourself organized!


Keine Kommentare:
Kommentar veröffentlichen